User management (admin)
As administrator with permission “Can manage users and groups” you can add and edit Zefort users. Navigate to user management through USERS icon on the left side panel. In user management you can:
- add new users, edit or delete existing users,
- search users,
- manage user’s binder permissions,
- create user groups and
- download binder access report.
You can also choose default settings for new users in the account settings.
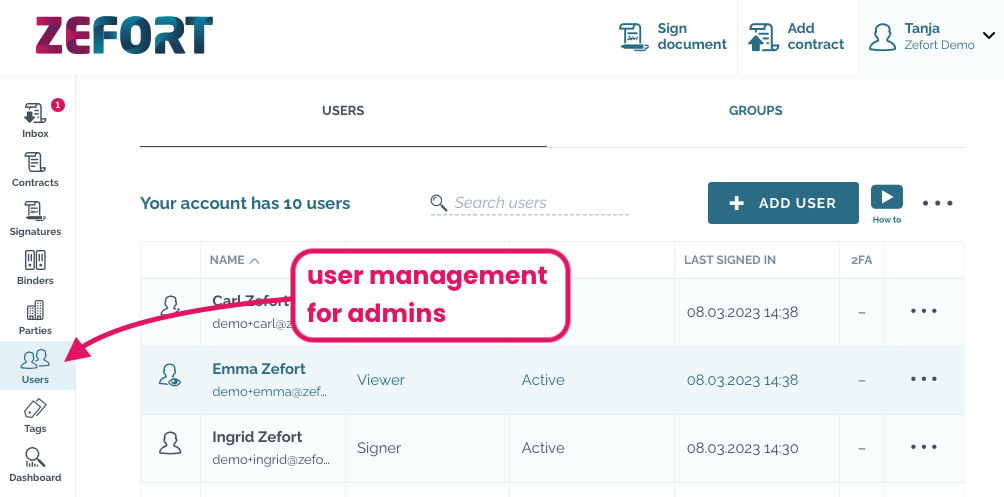
NOTE: Only administrator with “Can manage users and groups” permission can access the user management.
Add new users
There are three different ways to create new users in Zefort:
Creating users manually (login with password)
If you are creating users manually in Zefort, follow these steps:
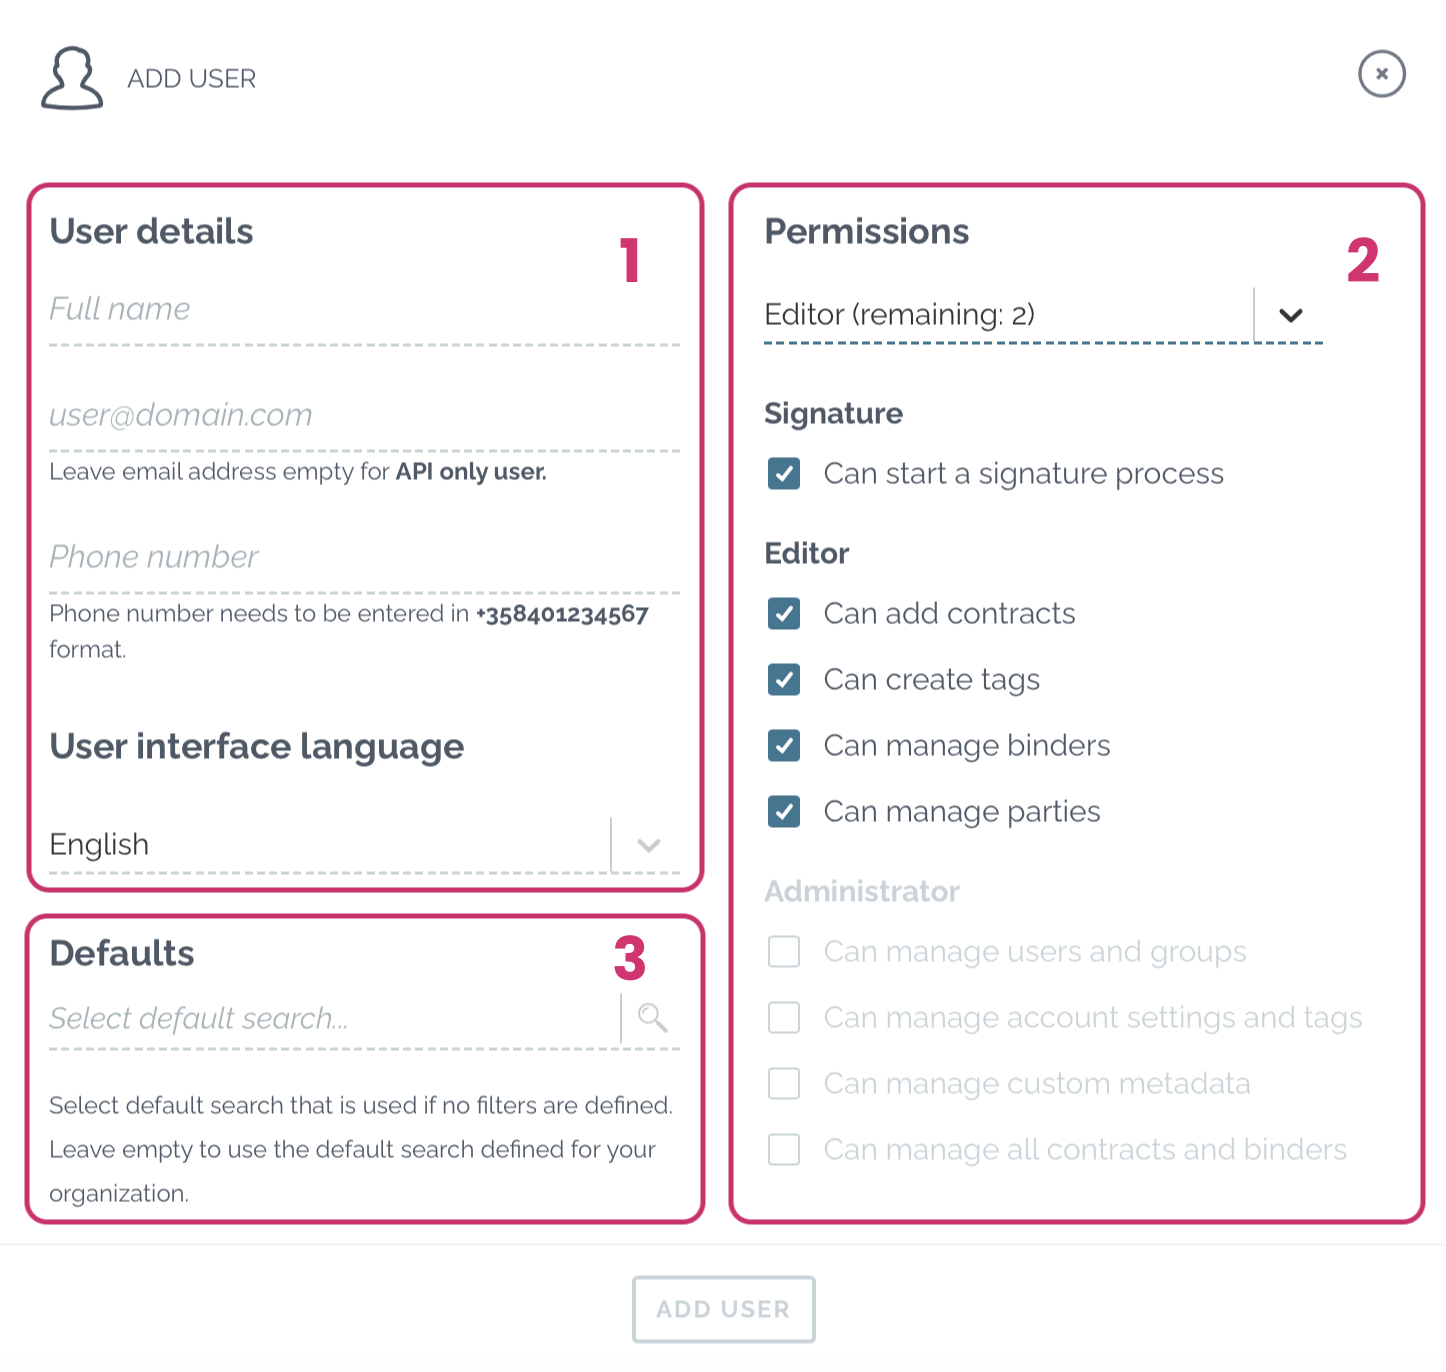
- Click + Add user
- Fill in user details [1] and choose user language
- name
- email address
- phone number (optional)
- Select license [2]: signer, viewer, editor or admin
- Select permissions for the user
- for editor you can select whether this user can
- upload new contracts into Zefort
- create new tags in contract’s DETAILS tab
- create new binders and manage (the ones where he/she is an owner)
- access the party manager and add/edit parties
- manage forms
- in addition admin can have rights to access
- user management
- account setting and tag manager
- custom metadata in account settings
- ALL content in the account
- for editor you can select whether this user can
- You can also set a default search for the user [3]
- Click add user
User will get an email from Zefort, including the activation link. With this link user should activate the account and set up their password to Zefort.
We also recommend using 2-factor authentication (2FA) with at least two devices.
In case the link expires before user has activated the account, admin can resend the activation link.
Using Zefort through API (login with API key)
If your organization is using Zefort through API, you need to create users manually in Zefort (as instructed above). Note exception: leave the email field empty in this case.
Next you need to create API keys in the account settings:
- Open Account settings > API keys
- Click + create api key
- Give name to the API key and select Zefort user
- Zefort creates a secret key, store it in a safe place
(note: you won’t see the secret key once you have closed the window)
Read more about API connections.
Bringing users from IdP (login with SSO)
In case you are using Single Sign-on (SSO) for logging in to your account and want to bring users with from your organization IdP (such as Azure AD for example), please check these articles:
- Setting up single sign-on (SSO) with OpenID Connect (OIDC)
- Configure single sign-on (SSO) with Azure AD
- Configure user and group provisioning with SCIM and Azure AD
- Managing user licenses via SCIM
User licenses and permissions
In the below table you can check which permissions can be granted to which license.
| Permission | LICENSE | |||
| ADMIN | EDITOR | VIEWER | SIGNER | |
| Can start a signature process | x | x | x (1 | x (1 |
| Can use ChatGPT (2 | x | x | x | x |
| Can add contracts | x | x | x (3 | x (3 |
| Can create tags | x | x | ||
| Can manage binders | x | x | ||
| Can manage parties | x | x | ||
| Can manage forms | x | x | ||
| Can manage users and groups | x | |||
| Can manage account settings and tags | x | |||
| Can manage custom metadata | x | |||
| Can manage all contracts and binders | x | |||
| Notes
1) Permission “can add contracts” is added automatically 2) ChatGPT is a add-on feature 3) Possible only with Zefort Sign |
||||
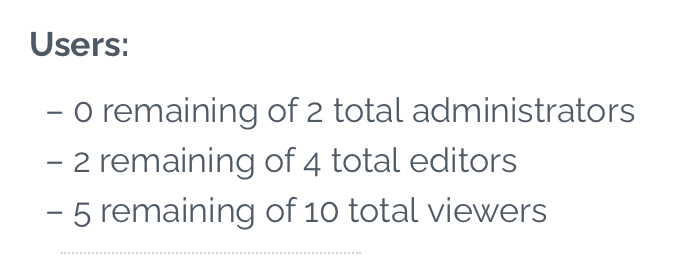
View account licenses
Open Account settings and on the first page “Subscription” you can review your account details.
You can check how many licences you have in total and how many of them are still available.
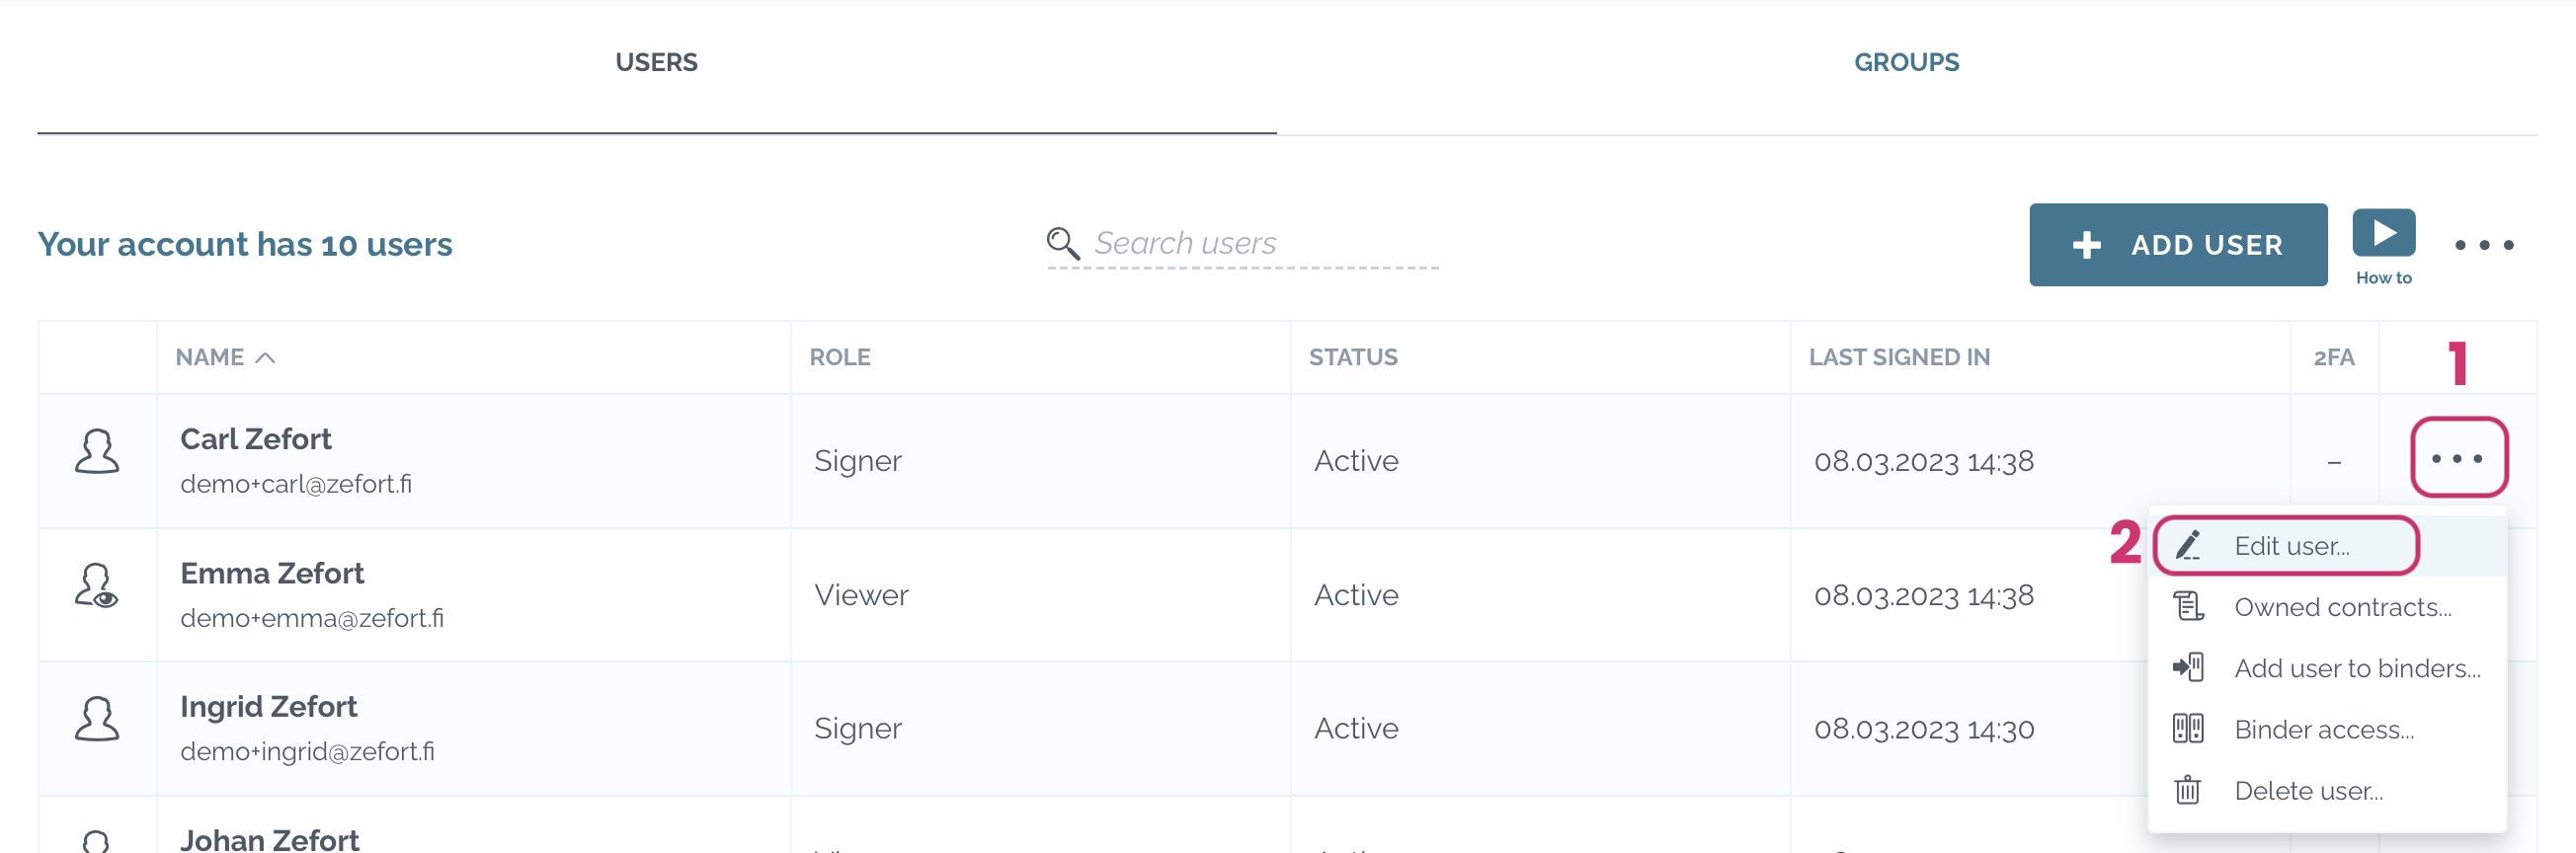
Edit users
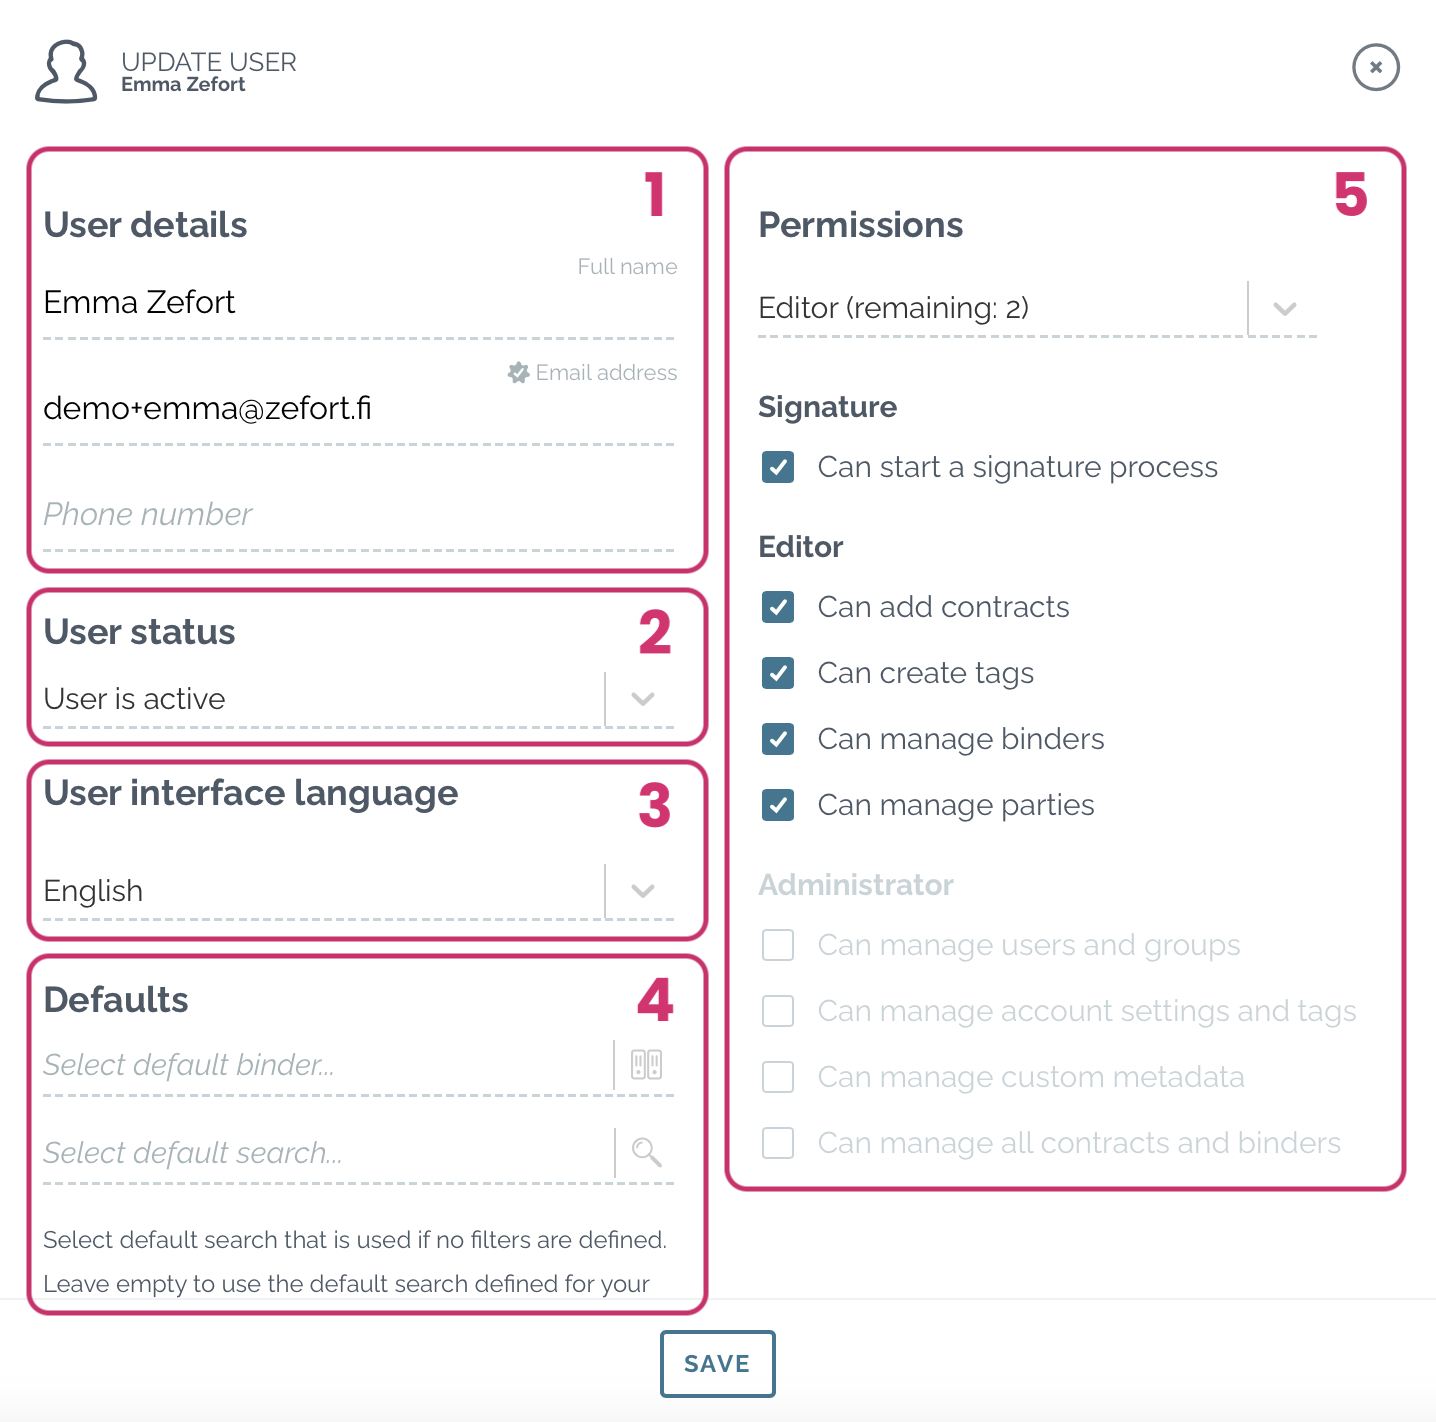
To edit an existing user select click menu ••• [1] > “Edit user” [2] or click on the user row to open update view.
You can:
- Update user details [1]
- Set user status as active or inactive [2]
- Change user interface language [3]
- Select default search and default binder [4]
- Edit user licence and permissions [5]
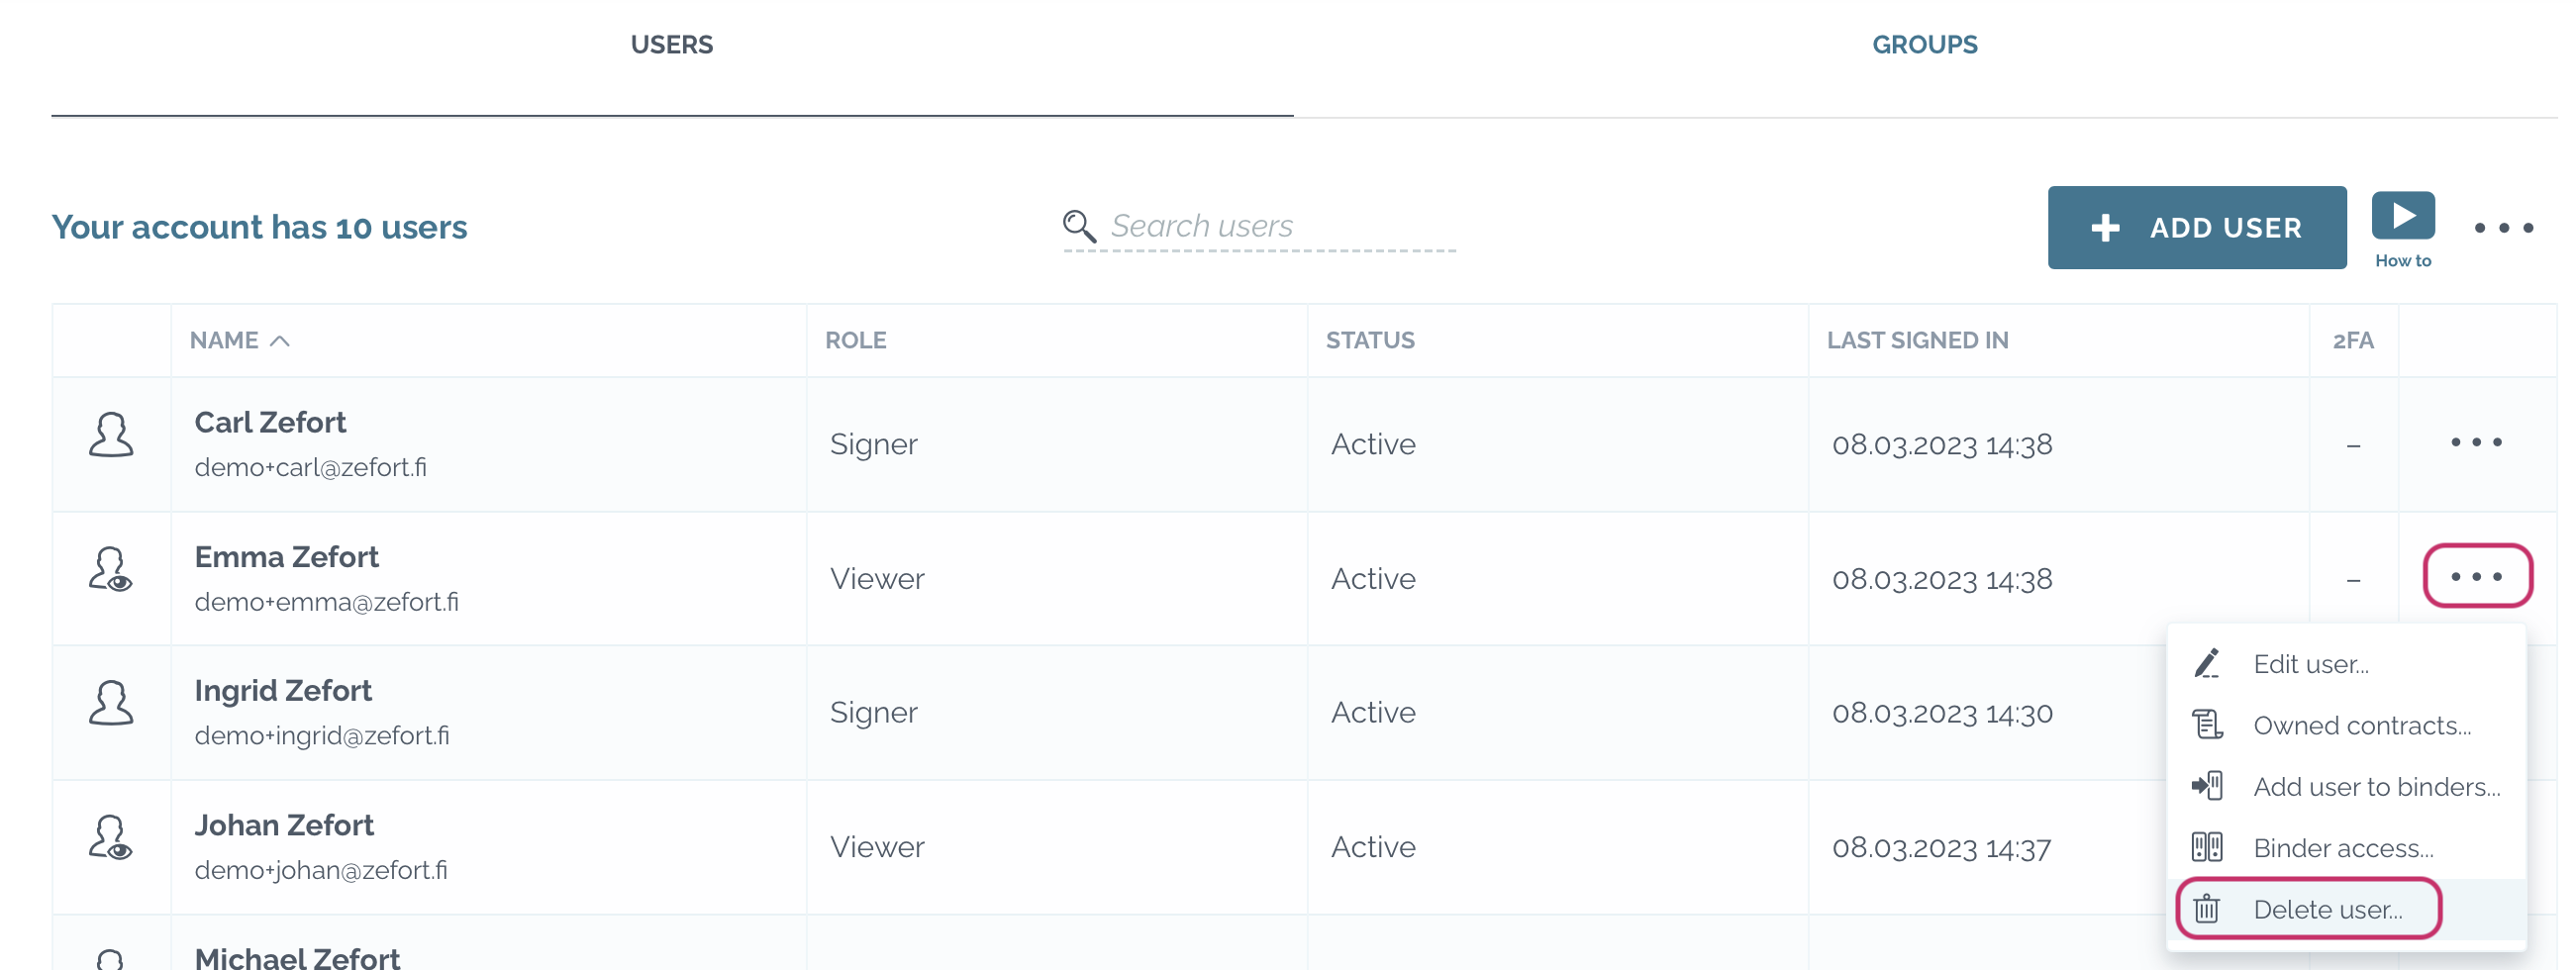
Delete users
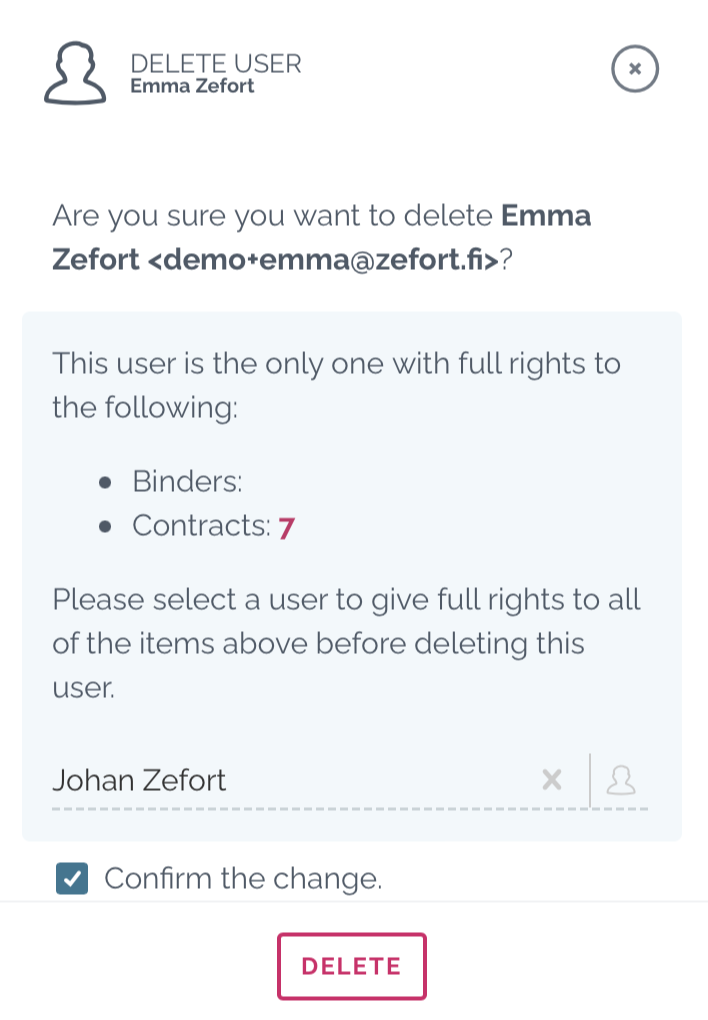
To delete an existing user
- Select “Delete user” in the menu •••
- Select the user who will inherit all items which the deleted user has in Zefort (contracts, binders, reminders etc.)
- Confirm the change and click delete
View and edit binder permissions
To view and edit user’s binder permissions, open menu ••• [1] of the selected user.
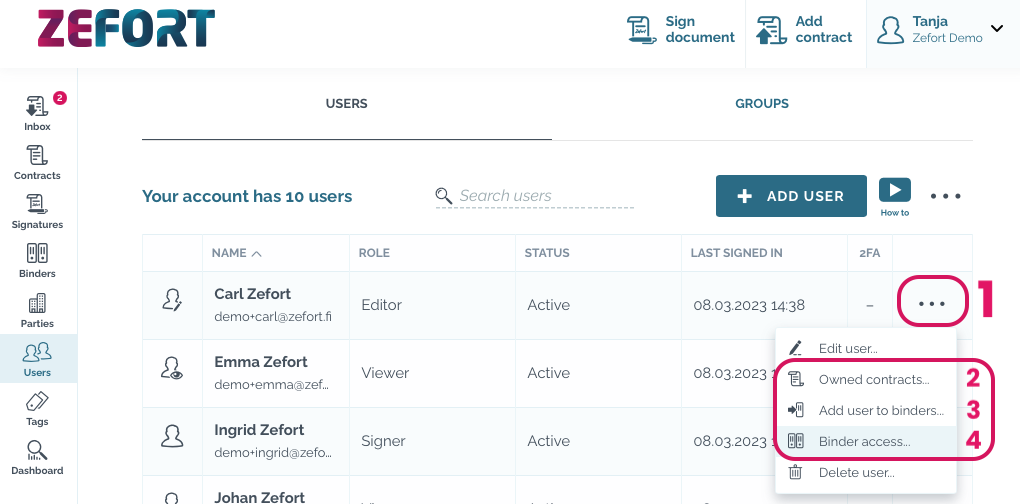
- To see which contracts the user owns: click “Owned contracts” [2] from the menu
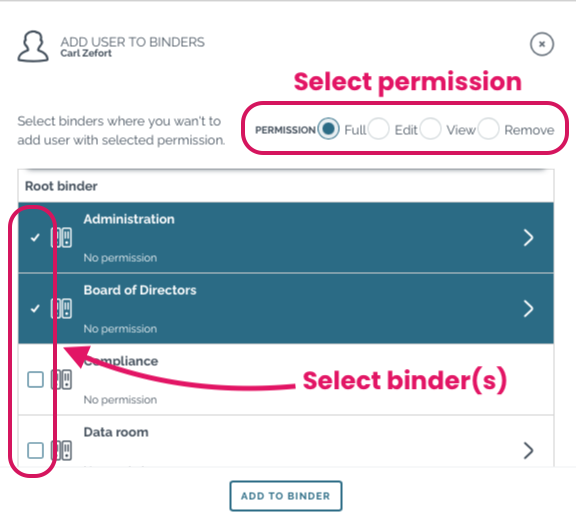
- In “Add user to binders” [3] you can add or remove binder permissions of the user: click the binder tick boxes and choose whether user has full, edit or view right to the selected binder(s). Permissions can also be removed.
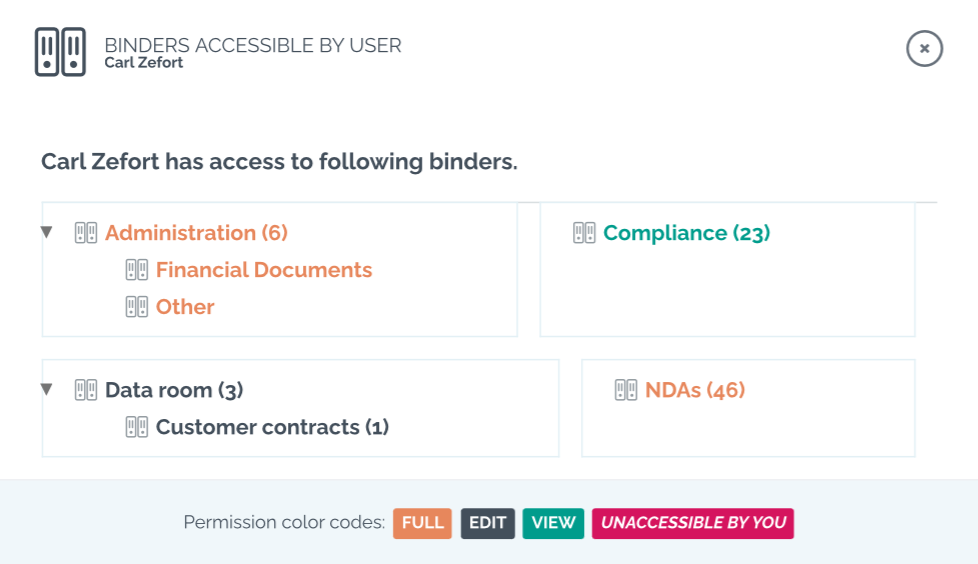
- To see what binder permissions a specific user has, select “Binder access” [4]
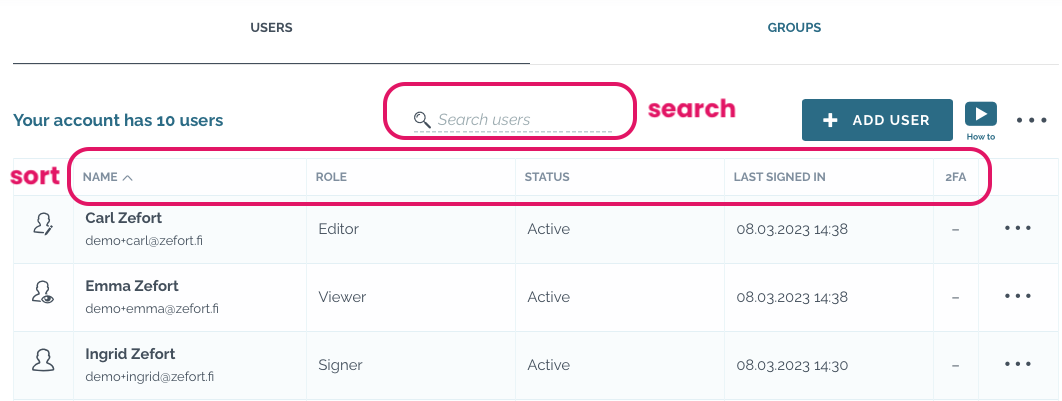
Search users
- You can search users, just type the name in the search field (in the top middle of the users view)
- Sort users by clicking the column header
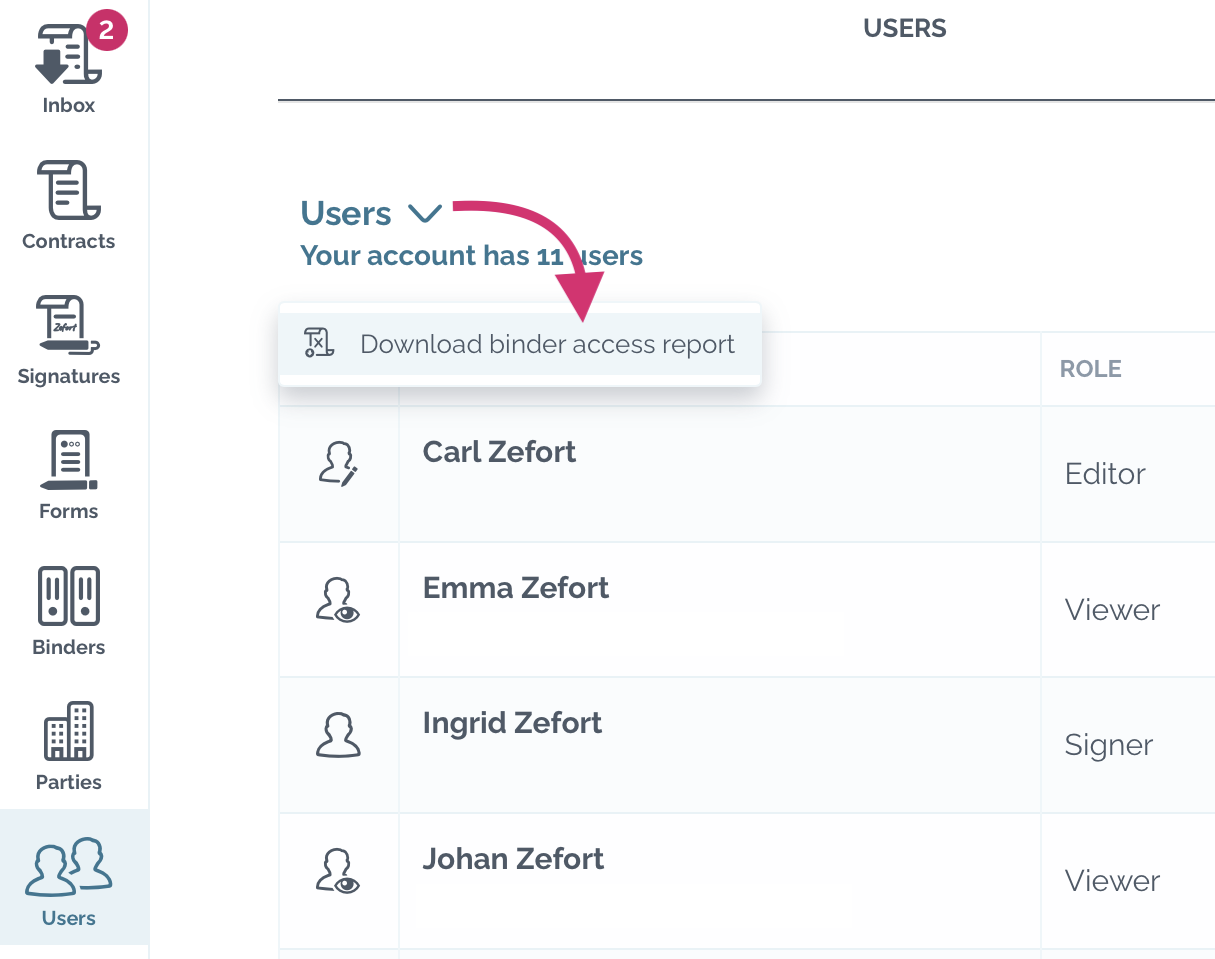
Download binder access report
- In USERS view view click “Users” on the left side above the user list
- Click “Download binder access report”
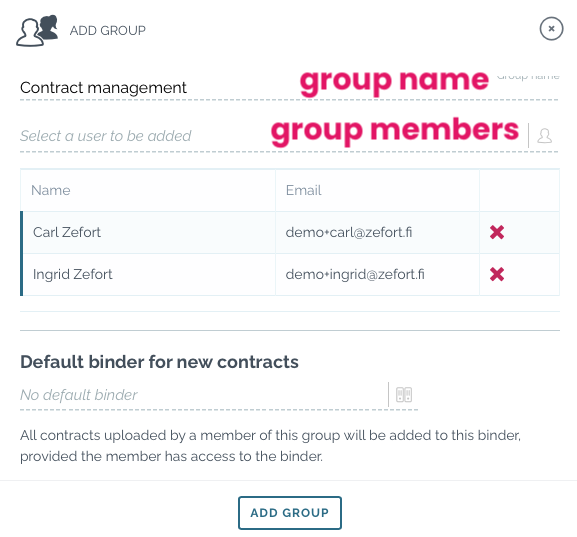
Create and edit user groups
- Click GROUPS tab [1] on the right
- Click + Add user group [2]
- Enter a name for the group
- Select the users for this group
- Select a default binder for new contracts if you wish (Note: all contracts uploaded by a member of this group will be added to this default binder, provided the member has access to the binder)
- Click Add group

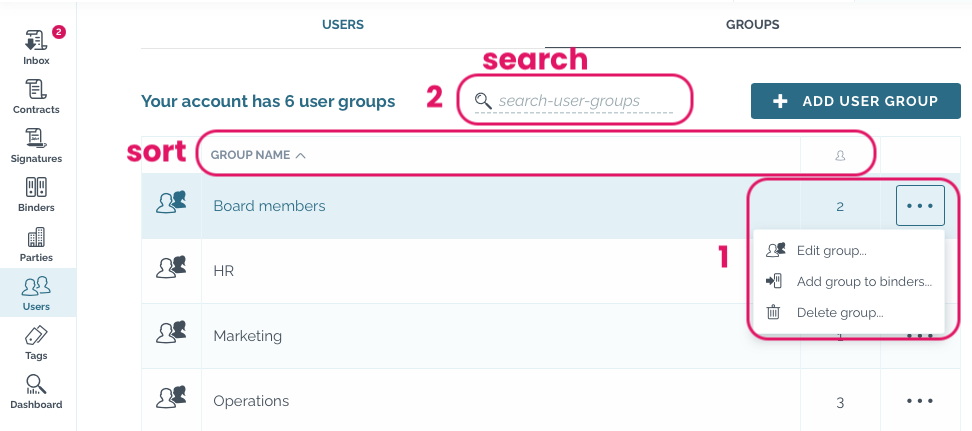
From the row option menu ••• you can edit and delete groups and give access to binders to users in specific group. [1]
In groups view you can also sort and search [2] groups and see how many members the group has.
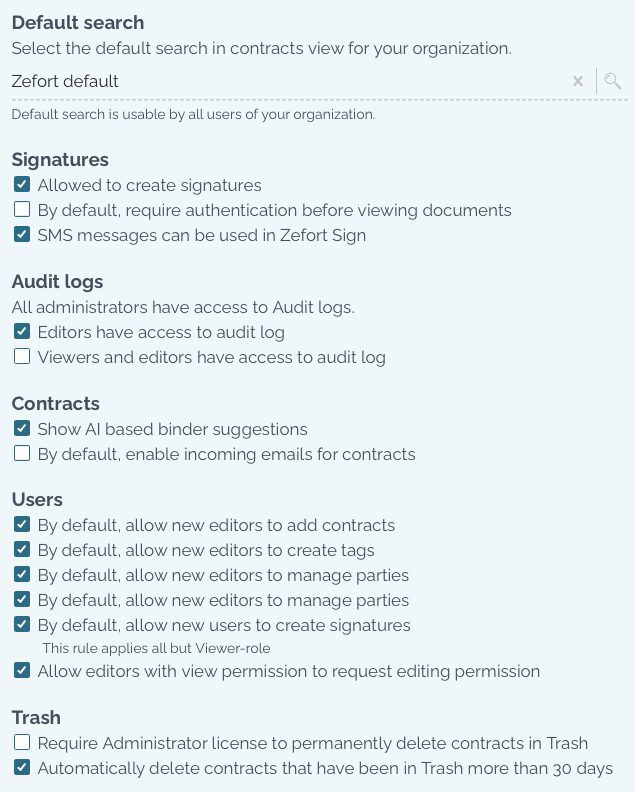
Choose default settings for new users
If you are an administrator with permission “Can manage account settings and tags”, you can edit the default settings for new users:
- Open Account settings from the menu (in top right corner)
- Click “Organization” tab
- On right side you set default permissions for new users:
- By default, allow new editors to add contracts
- By default, allow new editors to create tags
- By default, allow new editors to manage binders
- By default, allow new editors to manage parties
- By default, allow new users to create signatures
- By default, allow new editors to manage forms
- Allow editors with view permission to request editing permission
These settings will apply for all new users that you add in Zefort. You can change the permissions individually for each user.